Adding a contact form to your questionnaire
1. To add a contact form to your questionnaire flow, click on the Lead Generation Form in the +Add Question window.

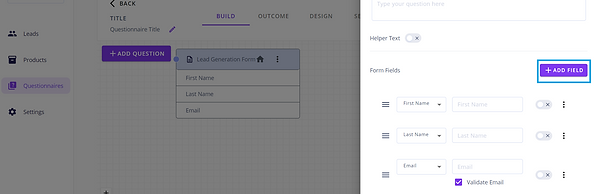
2. Once the editor window opens, you will be able to see the question type at the top, along with the Lead Generation Form Identifier field. This field allows you to distinguish between different lead generation forms if there are more than one in your questionnaire flow.

By default, the identifier for the form will be 'Lead Generation Form n' with the number being incremented by 1 each time a new lead generation form is added to the builder.
3. You can enter the question text in the Question text field. This will allow leads to understand the purpose behind the contact form.

4. By default, the First Name, Last Name, and Email fields are shown on the contact form, but other fields can be added in by clicking on the +Add Field button.
5. Once you have added in a field to the contact form, you can change the placeholder text by entering the appropriate text into the field. This will show to leads as the placeholder text in the textbox.

6. The header label for fields can also be changed by clicking on the vertical ellipses next to each field and selecting the Edit Header Label option.


7. Once the label has been updated, it can be saved by clicking the Save button.

8. Once the relevant fields have been added to the contact form, you can change the text of the submission button to be more personal to the service you are offering.
